Preface
I won’t start with questions like what or why. I will start with how and why. Let’s begin.
Main
install eslint
Install global eslint package:
npm i eslint@latest -g |
Then setup a config file. For example:
cd / |
Then it will give you some choices.
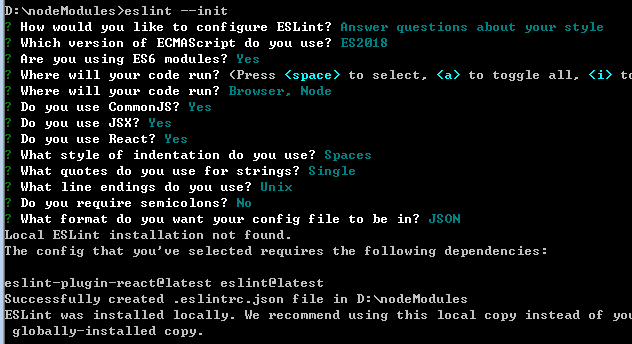
tips:
- You may need to
npm initfirst but you can remove it later. - If you can’t use arrow key, you may try use cmd.exe instead.
After that you will get a config file with some settings.
According to tips on terminal, you will need to load some packages like me because of your previous choices. So, I need to:
npm i eslint-plugin-react@latest -g |
Actually you can remove the package.json ( if you have ) now because we are making global eslint settings, not for a project.
As far, I have a global eslint config file (d:\nodemodules\.eslintrc.json). And my test file is test4.js. Here is the origin code:
let name = { |
So, how can I lint test4.js by d:\nodemodules\.eslintrc.json?
run eslint on terminal
Let’s switch to the folder of test4.js. Then for me, I run code below:
eslint --config d:\nodeModules\.eslintrc.json test4.js |
Result:
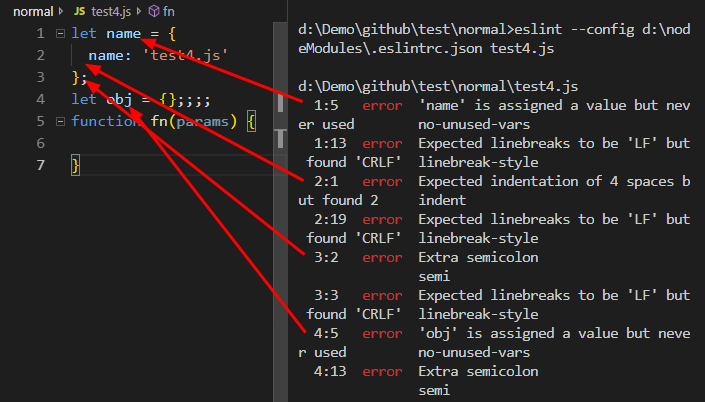
Here it is. Well, of course we want to fix it when run lint. So, according to ESLint doc we can try code below:
eslint --fix --config d:\nodeModules\.eslintrc.json test4.js |
Result:
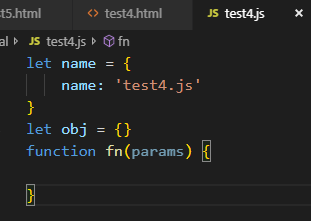

ESLint will fix some problems, mainly spaces. In the case above, no-unused-vars problems will not be fixed.
set custom rules
Futhermore, the expected indent is 4 spaces. But I want 2 spaces to be the default indent. So, we always set our own rules based on ESLint. In my case, I altered the d:\nodemodules\.eslintrc.json like:
{ |
Then, run the code above again:
eslint --fix --config d:\nodeModules\.eslintrc.json test4.js |
It works immediately. If you want to change other rules, you may have to know more about the existing rules in Eslint rules.
For me, For me, I usually set own rules based on standard not recommended rules and my custom rules is like:
{ |
In this case, we run again:
eslint --fix --config d:\nodeModules\.eslintrc.json test4.js |
Actually, I got error:

So, I have to run
npm i eslint-config-standard@latest -g |
It turns out I got more warnings.

So, I keep installing:
npm i eslint-plugin-import@latest eslint-plugin-node@latest eslint-plugin-promise@latest eslint-plugin-standard@latest -g |
After that, there is no correct warnings. So, I run
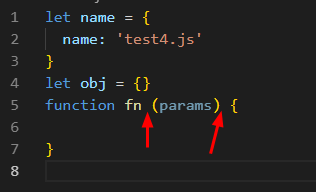
eslint --fix --config d:\nodeModules\.eslintrc.json test4.js |
I got a little difference because of different rules:
script in .html
If you use code above to format js in .html, it will fail. For example:
<!-- test4.html --> |
eslint --fix --config d:\nodeModules\.eslintrc.json test4.html |
Result:

See? Actually, we need plugins for non .js files. After search, I have to run code:
npm i eslint-plugin-html@latest -g |
Also, we need to update d:\nodeModules\.eslintrc.json and it would be:
{ |
After that, you run the code and ESLint would work for .html files.
move –fix to editor
As far, it seems there is only one flaw left. Do we have to run the code every time we want to format?
Actually, we don’t have to. For me, using vscode, ESLint provides plugins to do these jobs. For other editor users, you may want to check the ESLint doc.
Here is the operations for vscode.
Install ESLint plugin. Then add some settings in your User Settings.
{ |
After restarting your editor, you will see
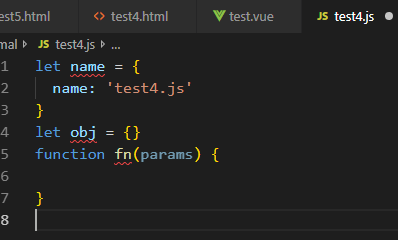
And

If your default settings of formatOnSave:true, then ESLint would format your code onSave.
make global and local config file independent
Until now, everything seems perfect with ESLint. But there is one thing I need to mention. Suppose that you create a new vue project using vue-cli.
vue create my-proj |
You may find that ESLinter error like below:

You can see this because we set the eslint.options in the User Settings. eslint.options setting is like passing it on the command line in a terminal using the --config. If you do this ESLint respects this and will not use the one in the project folder.
However, if we delete the eslint.options it won’t be able to format other files. So, the compromise solution is :
- delete the
eslint.options - move the global config file to the top.
For example:
home |
If we move the d:\nodeModules\.eslintrc.json to home, then delete the eslint.options. The result would be:
- code in project one will be validated using the local .eslintrc file
- code in project two will be validated using the .eslintrc file in your home directory
Got it? I learn this from Override global eslintrc if one is found in current project.
At last, eslint in User Settings is:
{ |
And in the folder of all projects, I have global eslint config file:
